ABSTRACT
Metrology, the science of measurement and its application, plays a critical role in the accuracy of GIA’s research and laboratory services. The metrology team closely monitors the performance of instruments and devices in all global laboratory locations, assessing accuracy (within the established measurement uncertainty of each parameter), repeatability, and reproducibility. Calibration objects traceable to a national standards agency (such as the National Institute of Standards and Technology) and working references traceable to those calibration objects provide benchmarks for these performance criteria. Instruments that do not meet these criteria are removed from service until repair and recalibration have been performed to restore measurement validity.
At GIA laboratories, both instruments and scientific equipment are used to collect data on gemstones. These data include physical measurements recorded as numerical values, graphical charts or plots, and various types of images. In each case, this information must be accurate and reproducible. This article outlines fundamental metrology concepts and the rigorous program used daily to ensure all measuring instruments are operating within tolerance across all of GIA’s global laboratories. This program is vital for maintaining the accuracy and integrity of the gemological data contained in GIA laboratory reports.
Measurement of various properties has been important throughout human history. The concept of establishing a reference object to assess accuracy dates back to ancient Egypt (Ferrero, 2015; MSC Training Symposium, 2022). Accurate measurements are critical in most industries. In construction, mistakes lead to unstable buildings. In medicine, inaccurate test results can result in misdiagnosis and improper treatment. In the gem trade, even a small discrepancy in carat weight can significantly affect the value of a gemstone.
Many assume that the measurement of a property is absolute—that each measured value is exact and every measurement of that property for a given object produces the same value. However, every physical measurement has an associated uncertainty, or tolerance, due to small, uncontrollable variations in the environment or in measurement recording procedures.
Consider the example of measuring human body temperature. In the 1860s, Carl Wunderlich used a primitive thermometer to measure the temperature of a group of subjects once per day. He recorded values between 36.5°C and 37.5°C and reported an average value of 37.0°C, which converts to the familiar 98.6°F. When we express this with measurement uncertainty, we understand the whole range: 37.0°C ± 0.5°C, or 98.6°F ± 0.9°F. More recent measurements (Mackowiak et al., 1992) found an average body temperature of 36.8°C (98.2°F), well within the uncertainty of the much older measurements but also revealing a diurnal variation in core temperature of about 1.2°C. Consideration of measurement uncertainty and measurement variance provides a different perspective on what constitutes a “low” fever.
Repeated measurements of well-characterized reference objects are central to establishing the uncertainty for any type of measurement. These objects can be traceable measurement standards or reference materials. In either case, “well-characterized” means that the property of interest has been measured independently (sometimes by several methods) from the current measurement device (or method or process). This provides a consistent basis for comparison. When that independent measurement links to a traceable measurement standard, the objects can then be used to maintain the calibration of a measuring tool or process over time or to ensure consistent results across different locations.
THE SCIENCE OF METROLOGY
Background. Metrology is the science of measurement and its application (Brown, 2021; www.nist.gov/metrology). It encompasses both the theoretical and practical aspects of measurement, which are at the core of all scientific endeavors. Three activities are essential to metrology: the definition of the units of measurement, the practical realization of measurements and their uncertainties, and documenting the traceability of measurements to reference standards. These activities fall into three basic subfields: fundamental metrology to establish new units of measurement, applied metrology in manufacturing and other processes in society, and legal metrology covering the regulation and statutory requirements for measuring instruments and methods. GIA applies metrology principles to a variety of instruments and processes to ensure the accuracy of measurements and to fully understand measurement uncertainties, instrument reproducibility (for each device and across devices in different locations), and maintenance requirements.
BOX A: DEFINING MASS: THE EXAMPLE OF THE KILOGRAM |
| The kilogram is the fundamental unit of mass in the International System of Units (SI). Originally known as the “Kilogram of the Archives” and defined as the mass of one cubic decimeter of water at the temperature of maximum density, the unit was redefined after the International Metric Convention in 1875. The International Prototype Kilogram (IPK), a cylinder of platinum and iridium, replaced the Kilogram of the Archives. The kilogram was now defined as being exactly equal to the mass of the IPK, which was locked in a vault of the International Bureau of Weights and Measures (BIPM) on the outskirts of Paris in the town of Sèvres. The accuracy of every measurement of mass (or weight) depended on how closely the reference masses used could be linked to the mass of the IPK. To ensure accurate measurements, mass standards used in countries around the world were, in theory, to be directly compared to the IPK. This was impossible in practice, so many countries maintained one or more of their own 1 kilogram standards (e.g., the National Institute of Standards and Technology, or NIST, which is part of the U.S. Department of Commerce). These national standards were periodically adjusted or calibrated using the IPK. Countries developed additional working standards that could be connected through the national standards back to the IPK using a carefully recorded series of comparison measurements. This system of multiple standards used within countries was not without its problems. Not the least of these was the difficulty of relating the mass of a 1 kilogram standard to that of a much smaller standard, such as the mass standard for 1 milligram, which is one million times smaller. The need for a new system in which scaling of large to small masses did not introduce uncertainty became widely recognized. In November 2018, a group of 60 nations voted to redefine the kilogram. No longer tied to the mass of a physical object, it was now related to the mathematical value of an invariant constant of nature, known as Planck’s constant (h). This followed the earlier redefinition of the meter (as the distance light travels in a vacuum in 1/299,792,458 of a second) and the second itself (in terms of the frequency, ν, of a forced transition in 133Cs atoms). Two fundamental physics equations could then be applied to redefine the kilogram. The Planck-Einstein equation tells us that a photon’s energy is related to its frequency by Planck’s constant: E = hν. Einstein’s famous equation of special relativity, E = mc2, tells us that energy is related to mass by the square of the speed of light. Setting these two expressions equal to each other, hν = mc2, or m = hν/c2. The units for Planck’s constant are joule-seconds (J·s), or kg·m2s−1; the units for frequency are hertz, or s−1; and the units for the speed of light are meters/second (m·s−1). Simple units analysis shows how a definition for the kilogram is derived: (kg·m2s−1) × (s−1)/m2s−2 = kg. An instrument called a Kibble balance provides the extreme sensitivity and stability required to measure mass or Planck’s constant precisely enough to support this change in the definition of the kilogram. According to this new agreement, the fixed numerical value of Planck’s constant h is 6.62607015 × 10⁻³⁴ J·s. As the reestablished kilogram is put into general practice, NIST continues to store a platinum-iridium cylinder called the Prototype Kilogram 20 and working copies of it. GIA uses mass standards that are traceable to the Prototype Kilogram 20 to calibrate its balances, ensuring that every gemstone weight is accurately described on GIA Diamond Grading and Gem Identification Reports. |
Carat weight, or mass, is just one of many gemstone properties measured at GIA (box A). Measurements of physical dimensions and facet angles of polished gemstones, assessment of color and quantification of fluorescence intensity, as well as spectral data and chemical analyses, all rely on traceable standards. GIA’s metrology team performs calibration and regular control checks of measurements for each of these factors.
Qualitative and Quantitative Measurement. Some gemological questions can be answered by qualitative measurement, which establishes the presence of a particular feature but does not assess the intensity of that feature. For example, infrared spectroscopy of an emerald can identify fracture filling, but it does not quantify the extent of the treatment. Other gemological questions can only be resolved with quantitative measurements, where the amount of signal is the deciding factor. One such case is a method used to separate terrestrial peridot from extraterrestrial peridot in which nickel concentration is measured at the parts per million by weight (ppmw) level. High concentrations of nickel, above 2000 ppmw, indicate a terrestrial origin (Shen et al., 2011; Sun et al., 2024). The concepts below apply to quantitative measurements.
Measurement Accuracy and Precision. Two key aspects of a measurement result are accuracy and precision. Accuracy describes how close the measured value is to the true value of the quantity being measured. Establishing such a true value often requires multiple methods and traceable standards (see again box A). Precision expresses how well multiple measurements of the same quantity agree with each other (an expression of the measurement uncertainty). As shown in figure 1, either aspect can be low or high.
Another perspective of accuracy and precision is to view them in terms of random error and systematic error (figure 2). Random error takes its name from the mathematical use of the word, and these deviations occur in all directions around the true value. Small fluctuations in environment or power supply or minor variations in operation can produce random error. Systematic error describes deviations that all lie in a common direction away from the true value, which suggests an issue with the device or environment that requires correction in order to obtain more accurate measurements.
Systematic error reduces accuracy, even when multiple measurements are averaged. Random error leads to lower precision (and higher uncertainty), even when the average of multiple measurements produces an accurate value. Among the four categories of results shown in figure 1, the goal of measurement is to achieve both high accuracy (the correct result) and high precision (low uncertainty).
Precision, Repeatability, and Estimates of Measurement Uncertainty. The intrinsic precision of a simple tool, such as a ruler, depends on the spacing of its measurement divisions. Any additional measurement uncertainty arises from the minor fluctuations of the operator as the ruler is applied and the value is read from the printed divisions. Underlying sources of uncertainty are much more challenging to find in a complex measuring tool, such as a spectrometer or polished gemstone scanner, so uncertainty is typically assessed through repeatability. This involves measuring a reference object many times, sometimes in sets under slightly different conditions, and analyzing this group of measurements with appropriate statistical tools (e.g., mean and standard deviation). Unlike accuracy, which requires traceable standards, precision and measurement uncertainty can be determined from any reference object that exhibits the property one wants to measure.
A large number of repeated measurements yields a distribution offering good statistical confidence for both the average value and the total spread of values. Most statistics textbooks describe methods for analyzing measurements. Both the National Institute of Standards and Technology (NIST) in the United States and the National Physical Laboratory in the United Kingdom offer convenient online references that also discuss estimation of error and propagation of uncertainty (Goldsmith, 2010; NIST/SEMATEC, n.d.). In a typical production process, however, it is preferable to make as few measurements of each item as possible while still achieving sufficient confidence in the results. In such cases, the particular purpose of the measurement becomes an important factor in using the overall measurement uncertainty to set a tolerance, the range within which two measured values are considered equivalent.
For example, a carpenter uses a tape measure to mark a piece of wood for cutting five boards of equal width. If the boards are mounted as separate shelves, differences in width of ⅛ in. to ¼ in. (3 mm to 6 mm) might be fully acceptable. But if these boards are to be used to support a load on a platform, a much tighter tolerance (about 1 mm) is required to keep the platform level. This might require a metric tape measure and additional measurements before making the final markings.
In applying metrology to a specific task, one goal is to reduce measurement uncertainty to levels below what the task demands. This can involve taking multiple measurements of each object to minimize inherent measurement uncertainty or developing more precise instruments. Regardless of the approach, uncertainty must be accounted for when comparing different measurements.
The number of digits reported for a measured value is constrained by the precision of the measuring device and should also correspond to the overall measurement uncertainty. This acknowledgment of significant figures also applies to calculations involving measured values. The general rule is that the least certain measurement limits the maximum precision of the calculated result (Yale Department of Astronomy, n.d.). A calculator may supply many digits for a calculation, but the number of significant figures and uncertainty for each measurement in the calculation dictates how many of those digits are truly supported by the measurement. Additional digits are described as “false precision,” and they obscure the true meaning of the measurement.
Consider the reporting of the length-to-width ratio (L:W) of a rectangular gemstone, which uses two decimal places by trade convention. A ratio of 1.05 or less supports describing the gemstone as square. A stone’s owner uses a micrometer with readability to 0.01 mm (and similar uncertainty), and measures 8.45 × 8.01 mm for length and width, for a ratio of 1.054931336. But because the input precision is only two decimal places, the result is rounded to 1.05. The owner thinks that the shape will be classified as square but does not factor in the measurement uncertainty or how close the ratio is to the boundary between square and rectangle. When that gemstone arrives at a laboratory, the scanning system measures 8.454 × 8.014 mm (with an uncertainty of ±0.005 mm), well within the uncertainty of the micrometer values. Now the calculated L:W is 1.054903918 and rounds to 1.06 ± 0.001 (for propagation of error, see again NIST/SEMATECH, n.d.), making use of the additional precision of the laboratory’s measuring device. The owner will be disappointed when the laboratory report lists the stone as a rectangle.
Reproducibility. Manufacturers of measuring tools and analytical devices strive to build each instrument consistently, but the reproducibility of measurements from one device to another cannot be presumed. This is especially true when instruments operate in locations with different environmental conditions, which requires checking for consistency. GIA’s laboratory locations cover both temperate and tropical climates, with wide variations in moisture. Although staff members in these locations are well trained in the established protocols for each measuring device, minor differences among device operators highlight the importance of assuring reproducibility.
Reproducibility measurements allow metrologists to track the performance of each device and assess whether any of them need extra attention. Figure 3 illustrates reproducibility results from measuring the maximum diameter of the same round gemstone several times on four different devices. Although all four devices give average values within tolerance of the target value (6.451 ± 0.010 mm), the results for devices 3 and 4 indicate that individual measurements have lost the desired reliability.
Regular circulation of various reference objects is necessary to monitor reproducibility for the various instrumentation used at GIA. Ideal reference objects are “blind,” meaning the operators do not recognize the reference objects as different from regular production work. However, obvious reference materials can also be useful, such as the synthetic crystals and glasses measured along with samples during each quantitative chemical analysis. Behind the scenes, metrologists analyze the data from these reference objects to ensure that every device in each GIA location produces results within the established tolerance for each property measured. GIA uses polished gemstones to track weight, dimensions, and color evaluation; polished oriented plates of various materials for spectral measurements; and solid-state references for X-ray fluorescence (XRF) and laser ablation–inductively coupled plasma–mass spectrometry (LA-ICP-MS).

Standards for Calibration and Measurement. Many measurements of interest to the gem industry are governed by specific international and national standards (figure 4). These standards cover length, weight, volume, angle, elemental concentration in solution or a solid matrix, and the color rendering index of light sources. Implementing such standards in daily practice involves both calibration objects and measurement reference objects.

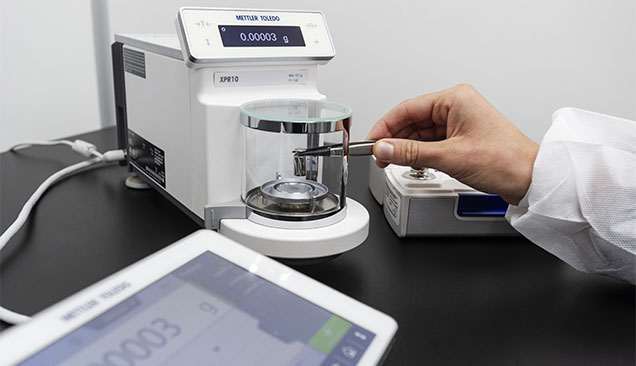
Calibration objects are typically purchased with a report of the actual value and its uncertainty for one or more measurable properties, tightly traceable to a national or international standards agency. They can be used to check the performance of a device and to adjust that device until it produces the actual value (figure 5). For example, GIA uses three traceable mass standards: 2 grams (10 ct), 500 milligrams (2.5 ct), and 100 milligrams (0.5 ct)—independently measured with seven decimal places of precision.
However, such objects may be of an inconvenient size or only available with higher concentrations than typical samples. Measurement references, or working standards, can be chosen for ease of use, and their values are tied to a calibration standard. When evaluating the practicality of a working standard, important considerations include:
1. Will the object fit within a device?
2. Will it remain stable over time?
3. Can it be easily transported between locations?
4. Will the measurement result be clear and unambiguous?
Ideally, reference objects are similar to the samples that will be measured. In the gem trade, diamonds and colored stones should be used as references whenever possible.
To ensure confidence in the accuracy of measurements, working standards must be traceable to national or international standards. To be traceable, a result must be linked to a reference through a documented, unbroken chain of calibrations, each contributing to the measurement uncertainty (https://www.nist.gov/standards). Traceability to NIST means that measurements are directly or indirectly linked to the NIST’s own calibration and measurement standards, which are themselves traceable to international systems such as the International System of Units (SI). This connection provides a high level of confidence in the accuracy and consistency of measurements.
SUMMARY
Metrology is a mature field with a wide body of work on fundamental and applied measurement that can be applied to specific measuring needs. One of the ways GIA ensures quality measurements is by verifying all of its instruments prior to measuring diamonds, colored stones, or pearls submitted to the laboratory for evaluation (table 1). Measurement references (many of which are gemstones) are measured periodically to ensure the results are within tolerance; some references are checked daily, others at the time of measurement. This process creates a record of measurements that GIA metrologists can use to observe trends, inform adjustments to instruments, or take instruments offline if their performance falls below standards for accuracy or precision. Monitoring this data from instruments worldwide provides a deep understanding of GIA’s capabilities to produce accurate and consistent measurements across all laboratory locations.
An internal team of metrologists, technicians, and engineers work on-site to actively monitor and adjust measuring devices. Robust validation, verification, and calibration processes result from collaboration within this global group. Senior team members routinely travel to each laboratory location to perform validation activities using master references, enhancing the alignment of GIA’s measurement equipment worldwide.
Color measurement of a faceted diamond, for example, is particularly sensitive and complex. The results must be accurate and reproducible regardless of the diamond’s color, fluorescence characteristics, size, or shape. GIA ensures alignment across the many colorimeters at each laboratory location using a reference set of diamonds representing the potential range of these attributes. Numerous measurements of these reference stones provide the statistical data needed to validate a colorimeter for use.
In addition to periodic validation, the metrology group regularly reviews daily verification data. Measurement trends are analyzed alongside instrument parameters and environmental factors such as temperature, humidity, and air circulation. Adjustments to instruments are performed based on these evaluations. This frequent monitoring also allows the metrologists to investigate measurement outliers and take corrective action.
GIA’s reports provide many details about the properties of a gemstone. Each detail is important for evaluating quality and documenting the nature of that gem. GIA invests substantial effort to ensure every measurement is made with the highest precision and accuracy, supporting its mission to ensure the public trust in gems and jewelry.


